
Preventative Health Care
Part of good husbandry is maintaining a program of preventative health care. This includes having regular, health checks with a veterinarian and the administering of appropriate worming or parasite treatments. There are also mandatory vaccination requirements in place for your greyhounds to prevent a range of diseases. To find out more, take a look at:
Hygiene and cleanliness to prevent and manage disease
As we all know, disease can have a significant impact on both ourselves and the greyhounds in our care. One of the biggest challenges that participants can face, is the potential for rapid spread of a disease where greyhounds are housed in a kennel environment. Disease outbreaks in kennels can have a huge impact on your ability to race dogs for a long period of time.
While diseases can often be treated effectively, prevention is always better than cure. There are many steps you can take to try and avoid a disease outbreak and respond if it occurs. You might see these measures being referred to as part of a “biosecurity response”.
Biosecurity includes:
-
- surveillance (the process of monitoring for possible disease outbreaks)
- isolation (physical separation of infected greyhounds from healthy greyhounds)
- quarantine (physically separating greyhounds that have been exposed to a disease and at risk of becoming infectious themselves)
- movement restrictions
- avoiding potentially contaminated areas
- reducing animal contact
- cleaning and disinfecting
- improving greyhound health through treatments and vaccinations.
Participants are involved in all aspects of biosecurity and are particularly important in the surveillance and management of disease outbreaks.
Remember, it is not always possible to tell by looking at an animal whether it has been infected but if you suspect an infectious disease, it is important you contact your veterinarian. You or your veterinarian should also alert GRV, and where appropriate the Victorian Government’s Chief Veterinary Officer to help monitor any potential outbreak.
Some examples of the common signs of canine disease
Gastroenteritis can be caused by many different things, but one example is Canine Coronavirus (not related to or able to be passed to humans). The virus is spread by contact with the faeces of an infected dog. Symptoms in greyhounds appear within a few days and can range from mild to severe and include:
-
- not eating well
- vomiting
- diarrhoea (soft cow-pat consistency to very watery)
There is some great information in our Medical Fact Sheet: FAQ Infectious Gastroenteritis.
Kennel Cough is spread as droplets in the air from one coughing dog to a healthy dog. Symptoms usually appear about 5-7 days after infection. Symptoms include:
-
- runny nose
- sneezing
- dry hacking cough
Annual vaccinations can significantly reduce the incidence and/or severity of this disease. There is some great information in our Kennel Cough Fact Sheet.
What can I do to avoid a disease outbreak?
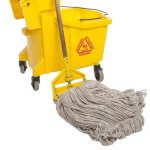
Maintaining a clean and hygienic kennel environment is critical in preventing disease, as is establishing a regular cleaning and disinfection roster. Being organised and thorough will not only save you time, but will ensure that you minimise the stress on the greyhounds in your care and limit the opportunities to spread disease by either direct (physical contact between dogs) or indirect transmission (spread of disease by humans via contamination).
Dirty and soiled living areas promote diseases and parasites which can quickly lead to sick greyhounds. So, as a preventative measure, you should always clean kennel and yard areas daily. This includes:
-
- picking up any faeces and old or uneaten food and disposing of it properly so as not to attract flies or vermin that can carry disease;
- cleaning and filling containers with fresh water and food;
- washing away urine;
- removing used or soiled bedding; and
- washing floor surfaces with hospital grade disinfectant or a detergent / disinfectant combination, in warm or hot water where possible.
All items used for feeding (including food preparation areas and utensils) should always be cleaned at the end of each feeding time.
Do not forget to clean bedding, coats and blankets in the washing machine on a regular basis. If these items build up dirt and hair, fleas and diseases can become embedded in the fabric and spread disease. At least once a week, the feed bowls, utensils, water containers and enrichment toys should also be disinfected.
A dishwasher (running at minimum temperature of 65°C) is a good way of disinfecting, using appropriate dishwashing detergent according to the manufacturer’s specifications. You should also wash, scrub and disinfect sleeping areas, kennels and runs, but making sure that the greyhounds are removed from the area first.
A veterinarian can advise on a suitable disinfectant. Once again, make sure you always follow the manufacturer’s instructions as you will be using the products in areas where a greyhound is sniffing, licking and in contact with areas where residue and fumes might be found.
Particular attention should be paid to cleaning (daily), disinfecting (weekly) and scrubbing kennels on a regular basis to minimise the risk of diseases, particularly when the greyhound occupying a kennel changes. The risk of any spread of a disease – which may not always be immediately obvious – can also be minimised by placing greyhounds back in their own kennel after toileting, exercising, training and racing. Moving greyhounds between kennels will lead to more rapid disease spread; unless you have time to completely disinfect the kennel run and bed before each new greyhound is placed in it.
Some tips when cleaning and disinfecting to avoid greyhound stress and exposure to disease risk:
-
- clean and care for the healthy greyhounds first; work your way through to the sick greyhounds after you have finished with the healthy ones
- always wash your hands, disinfect boots and equipment and change clothes before moving back to the healthy greyhounds;
- care for the young or vulnerable first before moving to the adult and robust greyhounds as they have better immune systems;
- minimise handling of sick greyhounds, while still making sure the greyhound is moved gently away from areas being hosed and cleaned;
- keep sick greyhounds separate from others and place them directly into a clean kennel or yard for some exercise;
- use the same familiar staff and clean and scrub around the same time of the day;
- provide separate equipment like mops, pooper scoopers and buckets for each area such as the main housing area, isolation or quarantine areas;
- try and use items such as disposable gloves, disinfectant foot baths, and separate overalls when working with the sick greyhounds.
Remember to always be thinking about where you are putting your hands and the greyhounds you are dealing with. Something as simple as touching the food bowl of a sick greyhound and then feeding and moving the bowl of a healthy greyhound can accidentally pass on a disease.
Hygiene is not just about cleaning and disinfection. Storage and waste disposal are also an important part of day to day routines to keep greyhounds healthy. Food needs to be stored in such a way that it does not spoil, and pests such as mice cannot access it. Pests can transmit diseases and it is always a good idea to have a pest management program in place.
Always be on the lookout for something that is not normal in your greyhounds. Daily observations by yourself or the team will be critical to picking up a potentially contagious infection and preventing spread. Some diseases only become evident after an initial ‘incubation period’ but being on the front line means you may well be the first to notice that something is not right. Pay particular attention to vulnerable groups such as puppies, whelping females or older or injured dogs.
If something is not normal:
-
- Separate out the greyhound that is showing signs of disease, ideally into a dedicated isolation area and consider isolating the greyhounds that have been living around them from coming into contact with other greyhounds on the property!
- Immediately call a veterinarian!
Preventing disease on your property means that you also need to think about how you plan for disease risks that might come from outside your property. It is important to have a plan in place for when new greyhounds arrive on your property. Most new greyhounds should be housed separately for at least 10 days and observed for any signs of diseases before being introduced to the main kennel block.
What do I do if there is a disease outbreak?
Even with the best care and prevention, it is still possible for an unexpected disease outbreak to occur. It may be that dogs or people that have travelled off the property you work at have been exposed to disease, or it may be a new disease outbreak in your area. Excellent hygiene, early detection of disease and immediate quarantine of affected greyhounds will go a long way to preventing further the spread of disease.
Keep these practices going and if necessary, step up your cleaning and disinfection regimes to daily, especially where the disease is transmitted via faeces. Control where your greyhounds move on your property, and importantly ensure all the people interacting with the greyhounds and each other, including those coming from outside the property, follow good hygiene practices and movement. Avoid the unnecessary movement of unwell greyhounds off your property and don’t forget to clean equipment and vehicles going on and off the property.
Even the simple things such as washing hands after handling greyhounds from other properties, or asking visitors to dip their shoes in hospital grade disinfectant before walking around your greyhounds, kennels will go a long way to keeping your people and your greyhounds healthy. For more information on biosecurity you can find useful information in the Biosecurity Fact Sheet here.
Example Infectious Disease Cleaning Protocol
Kennels and walkways (all kennel areas)
The following kennel deep cleaning protocol is to be used in the event of an outbreak to clean kennels between greyhounds. Greyhounds are NEVER to be in kennels while deep cleaning is carried out. The entire area will be cleaned, disinfected and dried prior to re-introducing animals.
Clean agent used: F10
Cleaning schedule: After infected or suspected to be infected greyhounds have been removed
Cleaning protocol:
-
- Remove all greyhounds from the kennels to be cleaned.
- Remove all soft materials, including beds, blankets and coats from the area. These items are to be cleaned or disposed of as advised (see ‘soft material cleaning protocol’ below).
- Remove all food and water bowls for cleaning and decontamination (see ‘food utensils cleaning protocol’ below).
- Remove debris and gross contamination (e.g. faeces, hair, food, litter etc.). Dispose of these items in the general waste skip bin at the front of the GAP property.
- Apply cleaning agent using a watering can, bucket, or pressure washer as appropriate.
- Using a nylon or plastic scrubbing brush, scrub all surfaces which greyhounds or people may contact:
- Within kennel blocks, cleaning should occur from the highest point on the rear wall and work across and down towards the lowest point at the front of the kennel. Ensure that the kennel doors are cleaned from both the inside and outside.
- Clean all doors and gates leading into the kennel area, common work areas (including light switches, sinks, air conditioning controls and taps)
- Clean floor of common walkways last
- Ensure that bucket water is changed regularly (as soon as soiling of the water is visible) OR preferably use a rinse bucket filled with clean water to clean the brush prior to reloading with clean detergent.
- Thoroughly rinse detergent from all surfaces starting from the top and working down in the same order as described in point 7. Where existing drainage is inadequate, and run-off flows into the adjacent kennels, or where no barriers exist between kennels, clean from the pen which is least likely to be affected by run off and ensure that all spray runs in the same direction as the run-off, to prevent recontamination of cleaned surfaces.
- Scrape excess water from surfaces which do not drain properly into drains.
- Using the selected disinfectant, apply disinfectant to all cleaned surfaces working forwards and down from the upper-rear surface of the kennel runs or walkways. Leave disinfectant for the full contact time.
- Clean boots and ensure that your hands are clean prior to re-entering area when rinsing disinfectant. When rinsing, use a low to medium pressure and work forwards and down from the upper-rear surface of the kennel runs or walkways, ensuring that run-off does not re-enter clean kennels (as much as possible given the current drainage system).
- Using a clean squeegee, remove excess water from floors and walkways by squeegeeing into drains.
- Wipe all common surfaces that cannot be hosed with disinfectant and dry with disposable cloth or paper towel. Dispose of used towels as infectious waste.
- Clean drains and pour clean disinfectant solution into open drains once debris removed (ensure good coverage and do not rinse this solution away)
- Allow area to dry thoroughly.
- Where required (e.g. non-sealed concrete, highly resistant pathogens such as ringworm). Repeat the entire deep clean process 24 hours later.
Soft material cleaning protocol
All soft materials, such as blankets, coats, towels and bedding, that can be cycled through the washing machine and dryers can be cleaned using this protocol.
Items that are heavily soiled and cannot be thoroughly cleaned, such as soft toys with dense stuffing, should be disposed of rather than cleaned. In addition, where the pathogen is particularly resistant to standard cleaning protocols, disposal must be considered over cleaning.
-
- All washable items must have debris and major organic matter removed prior to washing.
- Place items into the washing machine or soaking solution of F10. Loosely pack items in the washing machine. Discuss the best disinfectant with your veterinarian
- Optional step for items with dried soiling or highly resistant pathogens : Using Virkon or Kennel Sanitiser only, at the strongest working dilution, soak the items for 2 hours prior to washing. Take care when transferring soaked items to washing machine. Ensure that all soaking solution is discarded in sink and sink area is thoroughly cleaned and disinfected afterwards.
- Add maximum detergent amount for the machine (i.e. the amount for hard water and heavily soiled, large loads).
- Set machine to hot water cycle and use both soak and triple rinse cycles (where available). DO NOT add disinfectant to washing machine unless you have previously checked compatibility with the detergent used, as doing so can render both active ingredients ineffective.
- At completion of cycle, transfer items to dryer and thoroughly dry on a hot cycle.
Food bowls and utensils
-
- Where possible, all food bowls and utensils should be cleaned within the isolation/quarantine area and not taken outside of the area until clean.
- Empty all food and water from bowls and remove gross debris from utensils. Dispose of rubbish as infectious waste.
- Using standard dishwashing detergent, scrub all bowls and utensils in a sink of warm water.
- Rinse thoroughly and allow to stand so excess water drains off.
- Soak items in disinfectant solution (bleach, F10SC or Virkon as directed) for 10 minutes.
- Rinse all items thoroughly and allow to air dry on a clean draining surface.
- Clean and disinfectant sink area.
Pooper Scoopers
-
- Prepare a bucket of diluted disinfectant solution.
- Leave pooper scooper in pre-prepared bucket of diluted sanitiser solution after use.
- New water and sanitiser solution must be changed daily.
Greyhound Vaccination Requirement
Greyhound Racing Rules and the Victorian Government’s Code of Practice for the keeping of Racing Greyhounds require greyhounds to receive a number of mandatory vaccinations.
Please click here for more information.
Dental Health and Your Greyhound
Routine dental care throughout a greyhound’s life is a vital part of ensuring their health and welfare. Poor dental and oral health is the number one medical issue in greyhounds and affects the bones, gum tissue and surrounding structures that hold the teeth in place. It not only causes pain but if severe enough, can affect a greyhound’s racing performance. It can also lead to significant costs for you in addressing significant dental issues on retirement where a simple clean and scale undertaken by a veterinarian is no longer sufficient.
![]() Signs of good and bad oral health
Signs of good and bad oral health
| Signs of good oral health | Signs of bad oral health |
|
Early signs:
More developed signs:
|
Of course, it may not be the physical signs that you immediately notice but behavioural signs that indicate that something is not quite right:
-
- a lack of appetite or not wanting to drink;
- reluctance to play with chew toys;
- dropping food from mouth;
- pawing or rubbing regularly at face;
- chattering teeth;
- swelling under the eye.
If you see these signs, you should immediately seek veterinary advice.
![]() Prevention is better than cure
Prevention is better than cure
There are many things that you can do to avoid significant dental issues later in life and are simply built into the routines caring for your greyhound.
It is recommended that as part of your annual health check and vaccination (mandatory under the Code of Practice for the Keeping of Racing Greyhounds) you ask your veterinarian to check your greyhound’s teeth and undertake any necessary dental treatment/implement any oral health management recommended.
It is also recommended that you provide:
-
- greyhounds with raw bones to help them clean their teeth naturally
- dental chews
- dry dental kibble (not moistened)
- chew toys
- oral rinses, gels and toothbrushing
To find out more on oral health in greyhounds, please visit the Oral Health Fact Sheet and take a look at the Greyhound Dental Disease Score Chart below.
| Greyhound dental disease score chart | |
Stage 1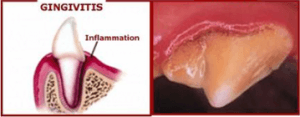 |
Treatment can reverse condition. Seek veterinary advise for management options. |
Stage 2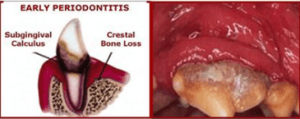 |
Professional treatment and dental care can prevent this from becoming irreversible. |
Stage 3 |
This is the beginning of periodontal disease and this may be irreversible. Seek veterinary advise for treatment. |
Stage 4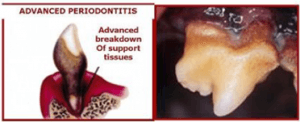 |
This is the chronic periodontal disease and this may be irreversible. Seek veterinary advise for treatment. |
Fleas and your Greyhounds
Fleas are the most common external parasite of dogs. Even the best-kept dogs can be infested with fleas, especially if they regularly leave their property. Left untreated the infestation quickly becomes a much bigger problem and can lead to other things such as tapeworm infection, anaemia (low red cells in the blood) and skin conditions such as flea allergy dermatitis.
At the track, the on-track veterinarian will be on the look-out for fleas, and infested greyhounds will be scratched from racing and sent home. It’s such a pity to have the dog just right, make the field and get scratched going over the table because your dog has fleas.
Many dog owners and trainers think that simply bathing their dog will solve the problem, but this is not the case. To understand how to truly keep on top of fleas, you first need to understand their lifecycle.
Fleas are a little bit like a mosquito in that they feed on blood. Without a feed of blood, they are unable to mature and lay their eggs. So, to the flea, your greyhound is simply a moving restaurant – they jump on, have a feed, leave and then lay their eggs and die.
The majority of the flea lifecycle takes place away from the dog – in the bedding, kennels, or even in the carpet of your house if your dogs come inside. What you see on the dog is only the tip of the iceberg.
How does the dog get fleas in the first place?
Even if your property is completely flea-free, your dogs can become infested if fleas are brought onto the property. This can be via a new dog coming into the kennels, through straw-type bedding (often infested from rabbits that live in hay sheds), or from yours or the neighbour’s cat that has been off wandering and has picked up a few fleas on their travels. Dogs, cats and rabbits all share the same fleas. Your dog may also pick up fleas when off your property.
The flea simply jumps onto the dog as it goes past. Once on the dog, the flea will usually head towards the rear, often spending most of the time in the hair above the base of the tail. This is why the best place to look for fleas is in this area, or in the less hairy parts of the dog such as the belly area or inside the thighs. Seeing fleas with the naked eye can be hard as they don’t like light, so if you part the dog’s hair the fleas will scramble into the dark areas.
Sometimes the only thing you will see is ‘flea-dirt’. This is simply the waste matter the flea passes out after digesting its meal. Flea dirt looks like normal grains of dark dirt in the coat, but if you wet it, it dissolves and turns a reddish colour. Similarly, if you are bathing the dog, and the water hits the flea dirt, it will turn into a reddish stain. If there is flea dirt, there are fleas, whether you can see them or not.
What happens once the flea is on the dog?
Once on the dog, they start feeding. The flea will suck blood from the dog, injecting saliva as they do it. This flea saliva can cause allergic reactions in some dogs, and they will quickly start to bite and scratch at themselves – similar to a person who is allergic to mosquito bites. This can lead to severe coat problems, dermatitis, and damage to the skin from biting and scratching.
Once the flea has had its meal of blood, it will start to lay eggs which simply drop off the dog. Each flea can lay hundreds of eggs, and these eggs can survive in the environment for quite a long time (even years) and are quite hard to kill. Because the eggs drop off the dog, common places for egg infestation are bedding, resting areas, and kennels – all places where dogs spend a lot of time.
Hatching of the eggs occurs when the temperature and humidity is right. The hatching can also be triggered by vibration. This explains why people who move into an empty house that has previously had pets often end up with flea bites – their movement triggers the eggs to hatch and the fleas have no pets to jump onto, and end up biting the people instead!
Flea eggs hatch into larva, which look similar to a microscopic maggot. They are not as tough as the eggs, and need warm, humid conditions to mature. The larvae then spin a little cocoon for themselves and turn into the next lifecycle stage – the pupae. The pupae can survive for months before hatching into adult fleas, so even if you think you have got rid of all the adult fleas, you will still have pupae waiting to hatch when the conditions are right.
How long does it take?
The whole lifecycle of the flea – from adult to eggs to adult can take as little as 2 weeks in the warm, humid months, meaning one flea can turn into hundreds which can turn into thousands in under a month! That is why flea problems tend to be worst in the spring and summer months when the weather is just right.
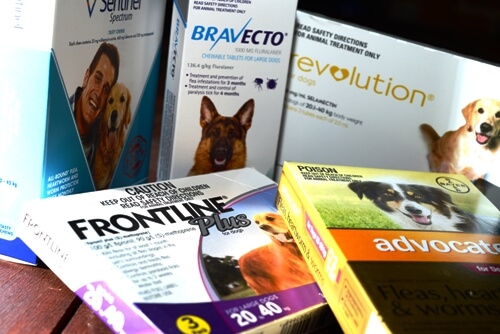
What should I do to keep my dogs flea-free?
Only 5% of the flea problem is adult fleas on the dog, so the only way to be successful in controlling fleas is to address the environmental infestation as well. In the past, people used flea combs to remove the adult fleas from the dog’s coats, but when the dog goes back to its kennel it gets re-infested.
Similarly, bathing the dog with a flea shampoo, or using a flea rinse will certainly kill the fleas on the dog at the time of the bath and rinse them from the coat, but it will do nothing to stop the dog becoming re-infested. Add to this, many of the ‘old-fashioned’ flea rinses are quite toxic, and there is little point to using them if you want to truly solve the problem.
These days there are many ‘spot-on’ products that not only kill the fleas on the dog when applied, but go on working to kill the fleas for up to a month. This can work quite well as you are basically using the dog to clean the environment – the eggs hatch, the fleas jump on and die, no new eggs are laid. The environmental store of eggs gradually all hatch and you end up with reduced environmental contamination. There are also products that have an added ingredient that stops the eggs from hatching. The product crystallizes and small crystals fall off into the dog’s bedding and elsewhere, causing any eggs there to become sterile.
Finally, addressing the environmental contamination can also reduce the burden. Regularly vacuuming carpets will remove eggs, but remember to empty the vacuum bag into the bin as the eggs will still be alive in the bag. Regularly washing dog blankets and bedding in hot (>60Oc) water for more than 10 minutes, or completely replacing carpet used in the kennels will also keep the environment cleaner. Avoid giving your dogs access to areas such as under the house, where the humidity and temperature are right for a fast flea lifecycle and where cleaning is almost impossible.
Finally, make sure that any new dogs coming onto your property are treated for fleas. Treating the arriving dogs yourself with a good quality flea product will ensure you keep the fleas away. Ask your greyhound veterinarian for advice on which products would best suit your kennel.
Hydatids (Tapeworm)
The Hydatid Tapeworm (scientific name Echinococcus granulosis) is one of a number of tapeworms that infect dogs. The reason this tapeworm is considered the most significant is that, unlike other tapeworms found in dogs, it can cause an extremely serious and life-threatening disease in humans.
Hydatid tapeworm disease in humans used to be a much bigger problem in Australia than it is now, largely due to the increase in feeding of commercial diets, better worming practices, and the shift towards life in the cities rather than rural areas. Despite this there are still a number of people, particularly children, who are diagnosed each year with this disease, and one or two people who die from it. Certain groups of people are at higher risk of contracting the disease, and most do not know they are affected until the disease is well advanced.
Understanding the Lifecycle of the Hydatid Tapeworm
Like many worms, the hydatid tapeworm has a complex lifecycle that involves a number of species. The mature worm lives and reproduces inside the dog’s intestines so it is considered a dog tapeworm (called the ‘definitive host’). It may also live in the intestines of dingoes and occasionally foxes too. The dog usually shows no signs of infection at all, and some dogs have been found with thousands of tapeworms in their intestines with no apparent illness.
The hydatid tapeworm is so tiny that it cannot be seen in the dog’s droppings – unlike other types of tapeworms which can be seen with the naked eye. The adult tapeworm can live inside the dog for a number of years, and during this time it will periodically produce and shed eggs which pass out in the dog’s droppings. These eggs can survive for months in the environment if the conditions are right – cool, moist, and overcast conditions are perfect.
The lifecycle of the hydatid tapeworm continues via an intermediate host – inside a different species of animal. In the case of the hydatid tapeworm, the intermediate host is sheep, cattle, or kangaroos which graze on the egg-infested pasture.
Once inside the intermediate host, the eggs hatch into larvae. These larvae then migrate through the stomach wall and into the bloodstream before lodging somewhere in the animal’s body – most often the liver and lungs. The larvae then mature to form a ‘hydatid cyst’ which is a watery, fluid-filled cyst in these organs. These cysts contain smaller capsules, with each capsule containing up to 40 hydatid heads – each of which are capable of turning into an adult tapeworm in the dog’s intestines once they are ‘digested’.
Luckily, in cattle, many of the cysts end up ‘dying’ and only about 10% can go on to infect a dog. But in sheep and kangaroos, the cysts are far more likely to remain infective, and the cysts can continue to grow over the life of the animal. When a dog (or dingo) eats the offal from an infected sheep or kangaroo, it also eats the cysts – the life cycle is then completed. Once inside the dog, the cyst releases the hydatid heads and they mature into adult tapeworms ready to start laying eggs within about seven weeks.

Why is this tapeworm such a concern?
The hydatid tapeworm does not cause any serious disease in the dog, so you would not think it would be a problem in our greyhounds. The worst effects are on the intermediate host – the sheep or kangaroo that ends up with huge cysts in their liver, lungs or other organs. The size of these cysts can lead to damage and eventually severe failure of these organs.
The reason this tapeworm is so significant is because sometimes a HUMAN inadvertently becomes the intermediate host – ingesting the eggs of the tapeworm. Similar to the effect in sheep and cattle, the infected human can develop large hydatid cysts in their liver, lungs or even kidneys or brain.
How do humans get Hydatid disease?
Humans can become infected with the tapeworm by accidentally eating the eggs that have been shed by dogs through contaminated food, or they come into contact with the eggs from handling an infected dog.
The hydatid eggs are quite sticky, and can remain stuck on the dog’s coat especially around the anus area. Dogs then lick to groom themselves, and the eggs can be moved through the coat, or can transfer to the face and mouth area of the dog. When a human pats or handles the dog, it is then possible to transfer the eggs onto their hands. People who eat, drink or smoke without washing their hands can then transfer these eggs into their mouth.
Alternatively, humans can become infected from eating raw vegetables (often home-grown ones) that have been contaminated by dog’s droppings. Making sure that dogs do not contaminate the vegie garden, and that all vegies are thoroughly washed can help avoid this.
Note: It is NOT POSSIBLE for humans to become infected by eating the contaminated offal of sheep or cattle
Once inside the human, the damage done depends on where the hydatid cyst forms, and also the size the cyst reaches. If the cyst gets large, the organ it is in will have reduced or altered function – a big cyst in the lungs can make a human very short of breath, a large cyst in the brain can act like a brain tumour. Often the human does not even know they are infected – until the organ fails, and then it is a case of being very sick and needing major surgery to remove the cyst.
Unfortunately, there is no medication to treat the hydatid cysts in humans – surgery is the only option. Sometimes during surgery the cyst leaks or bursts, and each of the leaked hydatid heads may go on to form other cysts, so multiple surgeries are often required.
Am I at risk?
The people with the greatest risk of becoming infected are those in rural areas where dogs and sheep or kangaroos live in close proximity. Anyone who feeds raw offal from sheep, cattle or kangaroos to their dogs is also at increased risk. Unfortunately, the greyhound industry tends to fall into these categories, meaning that many of our industry participants could be at risk if they do not take precautions to avoid becoming infected.
The Department of Primary Industries (Ag Note May 2008) recommends the following measures to break the Hydatid tapeworm lifecycle:
-
- Avoid feeding offal from possible intermediate hosts – especially sheep and kangaroos
- Do not allow dogs to roam or scavenge from sheep or kangaroo carcasses
- Treat dogs regularly with a worming product that contains praziquantelto remove hydatid tapeworm – it is recommended that dogs that are highly at risk are treated every 6-8 weeks
- Feeding offal to dogs, even if boiled, carries a significant risk of transmitting hydatids, so feed commercially prepared foods
- Wash your hands after handling dogs and before eating, drinking (and smoking) and make sure children are taught to do the same.
- Don’t allow dogs to lick anyone’s face
- Don’t allow dogs to defecate near vegie gardens or children’s play areas
At present Tasmania and New Zealand are both free of Hydatid disease, so those of you who send greyhounds to Tasmania to race will know that it is a requirement of entry into that State that all dogs are treated with a worm tablet to kill hydatids before they are allowed off the plane or ferry. The disease continues to be a problem in the rest of Australia so be careful, worm regularly, and avoid high-risk feeding practices.
Greyhound Veterinarians in Victoria
| Place/Area | Practice | Phone | * |
| Albert Park | Port Phillip Animal Hospital | 03 9686 8838 | * |
| Ararat | Ararat Veterinary Clinic | 03 5352 1021 | |
| Bacchus Marsh | Bacchus Marsh Veterinary Clinic | 03 5367 4000 | |
| Bairnsdale | Main Street Veterinary Clinic | 03 5152 6666 | |
| Ballarat | Eureka Veterinary Clinic | 03 5333 5959 | * |
| Bannockburn | Bannockburn Veterinary Clinic | 03 5281 1221 | |
| Golden Plains Vet Practice | 03 5281 2226 | ||
| Belmont | Geelong Vet Hospital | 03 5241 1796 | |
| Benalla | Benalla Veterinary Clinic | 03 5762 2788 | |
| Rose City Vets | 03 5762 6888 | ||
| Bendigo | Mc Ivor Road Vet Clinic | 03 5443 7749 | * |
| Passionate Vet Care | 03 5443 9385 | ||
| Biralee Park | Hume Animal Hospital | 02 6025 4088 | * |
| Melrose Animal Hospital | 02 6056 1544 | ||
| Broadford | Broadford Veterinary Clinic | 03 5784 1088 | |
| Bunyip | Bunyip Veterinary Clinic | 03 5629 5309 | * |
| Camperdown | Camperdown Veterinary Centre | 03 5593 1077 | |
| Casterton | Glenelg Veterinary Services | 03 5581 2000 | |
| Caulfield North | Caulfield Vet Clinic | 03 9527 7740 | |
| Cohuna | Clavin, Rogers & Associates | 03 5456 4148 | |
| Colac | Murray Street Vet Clinic | 03 5231 3375 | |
| Corio | Corio Veterinary Clinic | 03 5275 4575 | |
| Craigieburn | Craigieburn Animal Hospital | 03 9305 5855 | * |
| Cranbourne | Casey & Cranbourne Vet Hospital | 03 5996 2329 | |
| South Cranbourne Veterinary Surgery | 03 5995 1451 | ||
| Walnut Vet Clinic | 03 5995 5255 | * | |
| Creswick | Creswick Veterinary Clinic | 03 5345 2054 | |
| Drouin | Drouin Veterinary Clinic | 03 5625 2002 | |
| Drouin | West Gipps Vet Care Drouin | 03 5625 1707 | |
| Euroa | Strathbogie Vet Clinic | 03 5795 2811 | |
| The Racetrack Practice | 0400 503 735 | ||
| Foster | David Lucas Veterinary | 03 5682 2153 | |
| Gisborne | Gisborne Vet Clinic | 03 5428 2805 | |
| Glenrowan | Glenrowan Vet Clinic | 03 5766 2661 | |
| Hallam | Hallam Park Animal Hospital | 03 8786 3900 | |
| Hamilton | Hamilton Vet Clinic | 03 5572 2552 | |
| Ian Mcleod Veterinary Services | 03 5573 3223 | ||
| Hawthorn | Regional Greyhound Vet Services | 0448 304 070 | * |
| Healesville | Healesville Veterinary Clinic | 03 5962 4530 | |
| Heighton | South Valley Vet Clinic | 03 5244 4202 | |
| Horsham | Horsham Veterinary Hospital | 03 5381 1439 | |
| Inverloch | A’Beckett St Small Animal Vet Clinic | 03 5674 3822 | |
| Kerang | Border Vet – Kerang | 03 5452 2094 | |
| Keysborough | Keysborough Vet Practice | 03 9798 7274 | * |
| Kialla | Kialla Veterinary Clinic | 03 5823 1202 | * |
| Shepparton Greyhounds Veterinary Clinic | 03 5823 5577 | * | |
| Kilmore | Northern Veterinary Group | 03 5782 1574 | |
| Koo Wee Rup | Station Street Vet Clinic | 03 5997 2222 | |
| Kyabram | Dr Judith Mulholland | 03 5852 2000 | |
| Kyneton | Kyneton Veterinary Clinic | 03 5422 1310 | |
| Langwarrin | Langwarrin Veterinary Clinic | 03 9789 1682 | * |
| Lara | Lara Pet Hospital and Veterinary Centre | 03 5282 6080 | |
| Lara Veterinary Clinic | 03 5282 3243 | ||
| Longford | Longford Veterinary Centre | 03 5149 7697 | |
| Maffra | Animal Clinic Maffra | 03 5141 1788 | |
| Gippsland Veterinary Hospital | 03 5147 1177 | * | |
| Malvern East | Pet Emergency & Specialist Centre | 03 9569 3677 | |
| Mansfield | Delatite Veterinary service | 03 5779 1754 | |
| Mansfield Vet Clinic | 03 5775 2055 | ||
| Maryborough | Maryborough Vet Practice | 03 5461 4466 | * |
| Meadow Heights | Meadow Heights Vet Clinic | 03 9309 3199 | |
| Melton | High Street Vet Clinic | 03 9743 4942 | |
| Melton Vet Clinic | 03 9743 4413 | ||
| Metung | Metung Veterinary Clinic | 03 5156 2240 | |
| Mildura | Benetook Veterinary Centre | 03 5022 2455 | |
| Dr Deborah Abbenhuys | 0418 303 890 | ||
| Mildura Vet Hospital | 03 5023 3838 | ||
| Mooroopna | Causeway Vet Clinic | 03 5825 3911 | |
| Newborough | Newborough Vet Centre | 03 5126 2880 | |
| Old Sale Road Vet Services | 03 5127 4645 | ||
| Newcomb | Bellarine Veterinary Practice | 03 5248 2009 | |
| Newtown | Newtown Veterinary Clinic | 03 5221 5333 | * |
| Numurkah | Brennan’s Veterinary Services | 03 5862 3300 | |
| Numurkah Vet Clinic | 03 5862 1655 | ||
| Oakleigh East | Monash Veterinary Clinic | 03 9544 7455 | * |
| Pakenham | Animal Doctors | 03 5941 3822 | |
| Pitfield | Dr Pene Kirk | 03 5342 2461 | |
| Portland | Portland Vet Clinics | 03 5523 4900 | |
| Rochester | Rochester Veterinary Practice | 03 5484 2255 | |
| Romsey | Romsey Veterinary Surgery | 03 5429 5711 | |
| Rutherglen | Rutherglen Vet Clinic | 02 6032 8022 | |
| Sale | Sale Veterinary Centre | 03 5144 3100 | * |
| The Vets Mason House | 03 5143 0577 | ||
| Seymour | Seymour Central Vets | 03 5799 1922 | |
| Seymour Veterinary Surgery | 03 5799 1400 | ||
| Shepparton | GV Vets | 03 5878 1144 | |
| Shepparton Greyhound Veterinary Clinic | 03 5823 5577 | ||
| Shepparton Veterinary Clinic | 03 5821 3188 | * | |
| Smythesdale | Smythesdale Vet Practice | 03 5318 5750 | |
| Springvale | Sandown Vet Clinic | 03 9547 6666 | * |
| St Andrews | Dr Robert Kenney | 03 9710 1669 | |
| St Leonards | Dr Graham Franklin | 0417 319 564 | |
| Stawell | Stawell Vet Clinic | 03 5358 1666 | |
| Sunbury | Sunbury Animal Hospital | 03 9744 3611 | |
| Swan Hill | Pye Street Vet Clinic | 03 5032 3888 | |
| Swan Hill Veterinary Hospital | 03 5032 2483 | ||
| Tallangatta | Tallangatta Veterinary Clinic | 02 6071 2594 | |
| Tatura | Mooroopna Veterinary Clinic | 03 5825 3511 | |
| Tatura Veterinary Clinic | 03 5824 1755 | ||
| Terang | Terang Vet Clinic | 03 5592 2111 | * |
| Timboon | Timboon – The Vet Group | 03 5558 6666 | |
| Trafalgar | Trafalgar Vet Centre | 03 5633 1327 | * |
| Traralgon | Traralgon Animal Clinic | 03 5176 4677 | |
| Traralgon Vet Centre | 03 5174 1656 | ||
| Tylden | Dr Ian Porter | 03 5424 8301 | |
| Wangaratta | Wangaratta Vet Clinic | 03 5721 4000 | |
| Warracknabeal | Wimmera Mallee Veterinary Service | 03 5394 1100 | |
| Warragul | Devoted Vets | 03 5623 2525 | |
| West Gippsland Vet Care | 03 5623 4822 | ||
| Warrnambool | Lava Street Veterinary Clinic | 03 5561 1366 | * |
| The Vet Group | 03 5561 6911 | * | |
| Warrnambool Quality Vet Care | 0487 232 044 | ||
| Warrnambool Vet Clinic | 03 5561 2255 | ||
| Watsonia | Watsonia Vet Centre | 03 9432 7207 | |
| Wendouree | Ballarat Veterinary Practice | 03 5331 1533 | * |
| Wendouree Veterinary Practice | 03 5331 1533 | ||
| Werribee | Wyndham Vet Clinic | 03 9742 5556 | |
| West Footscray | West Footscray Veterinary Clinic | 03 9687 4542 | |
| Yambuk | Dr P D O’Brien | 03 5568 4350 | |
| Yarragon | Yarragon Vet Clinic | 03 5634 2758 | |
| Yarram | Yarram Veterinary Centre | 03 5182 5400 | |
| Yarrambat | Yarrambat Vet Hospital | 03 9436 1699 |
* Clinics indicated with an asterix contain veterinarians with a particular interest in greyhounds.